Animana supports the ordering of laboratory tests via IDEXX Reference Labs and VetConnect PLUS. After reading this article you will be able to place an order to an IDEXX Reference Lab from the patient file and you will understand how you can see results.
Before you start
- You need to have an active VetConnect PLUS (VCP) account. A VCP account is free and can be obtained through https://www.vetconnectplus.com/login. They will give you credentials for the VCP ordering and results download modules.
- In
 > General settings > User management: make sure all the vets have their usertype set to “vet”, so they can be selectable in the ordering module and are able to submit an order.
 - The VetConnect PLUS module needs to be set up first. Before proceeding with this article, make sure to follow the instructions on this article.
Step-by-step instructions
- Open the patient file of the patient you wish to request a test for.
- Click IDEXX Reference Lab. You will find this option at the end of the blue action buttons at the top of the patient file – either pre-selected or in the Diagnostics drop-down menu.
- The VetConnect PLUS pop-up window will open and show:
- Gender (autofilled from patient information).
- Species (autofilled from patient information).
- Breed (optional, Animana breed shown above the field).
- Veterinarian (select the vet requesting the test).
- Notes where necessary.
- Only when there are multiple Lab Account ID’s configured will an additional selection of lab nickname and lab account ID be available.
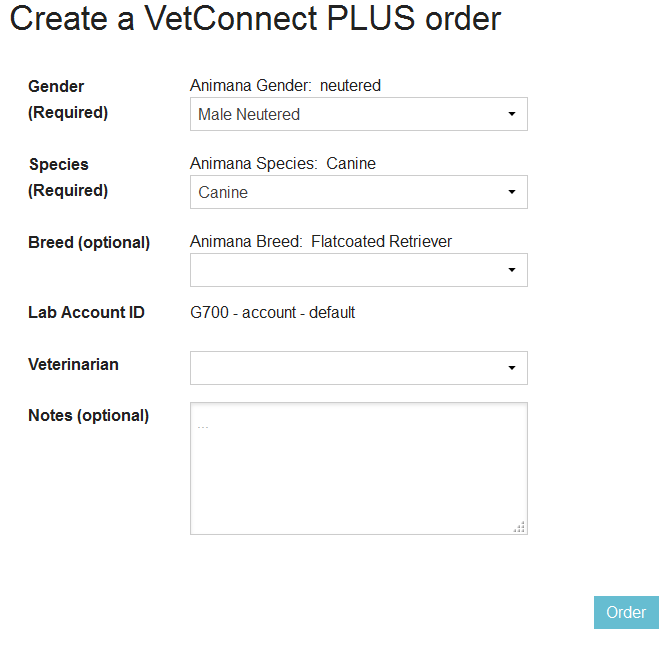
- Click Order. This will open the VCP module.

- Select your tests in the VCP module.
- Clicking the “i” icon will provide detailed information about the test.
- Clicking “Notes/Instructions” will open a window where you can enter the technician’s name, reference to any previous test request in case this is a follow up and some notes about the clinical details. If the test you are ordering is part of the IDEXX Advantage Programme, and you have run this test in-house already – then select the ‘IDEXX Advantage Programme’ to benefit from the applicable discount provided by the IDEXX lab. NB. it is important to send a hard copy of the inhouse results with the order form and sample to qualify for the discount.
- Click Order.
 The new order will now appear in the patient file with the IDEXX Order ID (VCP Requisition ID) and order status.
- When you click
 and then Edit Order you can edit the order. Once an order has been started at the lab, editing an order will not be allowed.
 - Click Order Form behind the same icon to preview the order and print the order form that will be sent to the lab with the sample.
- Click
 to cancel the order. Once an order has been started at the lab, cancelling an order will not be allowed. After clicking the red cross you will have to confirm your action and you are presented with a choice to immediately delete the order from the patient file or to do this later. Choosing ‘later’ will only add a dustbin icon to the order line in the patient file. We recommend you contact the lab to confirm that your cancellation was successful.
More about this
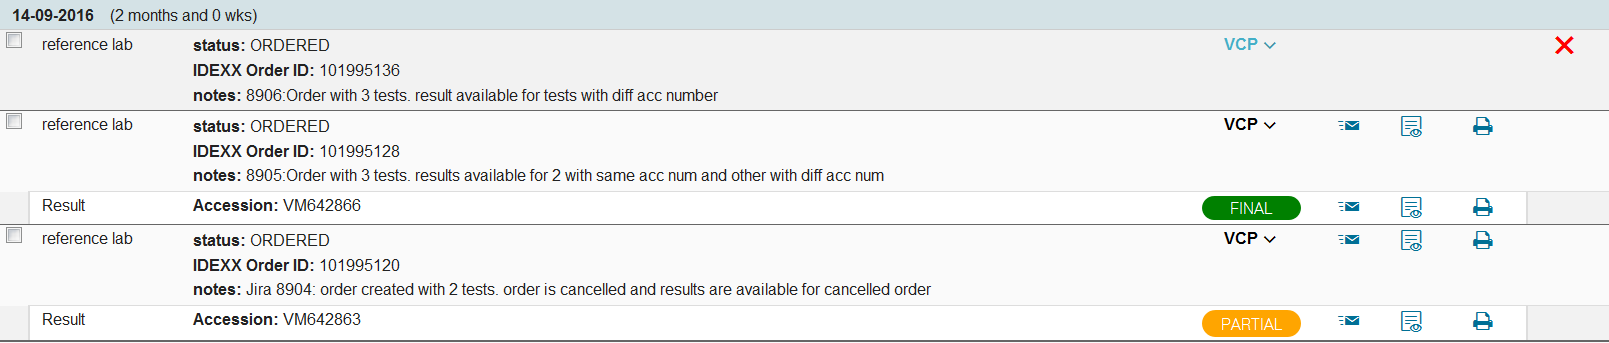
Where can I find the status of the order?
The order status can be seen on the order line in the patient file. There are a few options:
- CREATED – An order has been started, but the VCP order module window has been closed using the X before hitting the Order button. The order has not been sent! Possible actions within this status: Cancel Order, Edit Order

- ORDERED – The order has been placed in the VCP order module. Possible actions within this status: Cancel Order, Print Order Form, Edit Order

- CANCELLED – The order has been cancelled but not removed from the patient file. The only possible action within this status is to delete the order from the patient file.

Lab Results
Each lab result will have its unique number: the accession number. In some cases the lab will send partial results and therefore create several accession numbers. These will all appear as a separate line in the patient file.

Linking lab results
- The system will check for new results every 30 minutes. When a result is ready it will be automatically downloaded to Animana and if there is a matching order – will automatically link the result.
- When a result cannot be matched to an order the result will appear on Worklist > Lab results. The result can then be manually linked to a patient. Once linked, the order line and the option to view the results will appear in the patient file. (More on Lab Results here)
Viewing and emailing/printing the lab results
Once results come in, they are automatically matched to the correct patient if the order was placed from Animana and a matching order ID can be found.The below screenshot shows three different orders. The top one has no result yet, the second one has one result, which is final. The third order has one result which is partial.
To view the results, you have several options:
- In the patient file, go to the order and click on and choose View results in VC+. This will automatically open the VCP website to the selected order and associated result(s).
- In the patient file, go to the order and click on the PDF preview icon. This will open a PDF with all the results of the order.
- In the patient file, go to a result and click on the preview icon. This will open a PDF with that particular result.
- In Worklist > Labresults you can click the PDF preview icon to open the results PDF in a new browser tab. If an order has multiple results you will have the possibility to open each of them here.

To print the results, you can use the printer icon or you can print from the preview.
To email the results, you can use the email icon.
How do I enable automatic billing for Reference Laboratory tests?
Ordered tests sent to the IDEXX Reference Laboratory from the patient file can be added automatically to the invoice as shown below:
- In order to activate this feature you need to go to > General Settings > VetConnect PLUS and tick the following box:
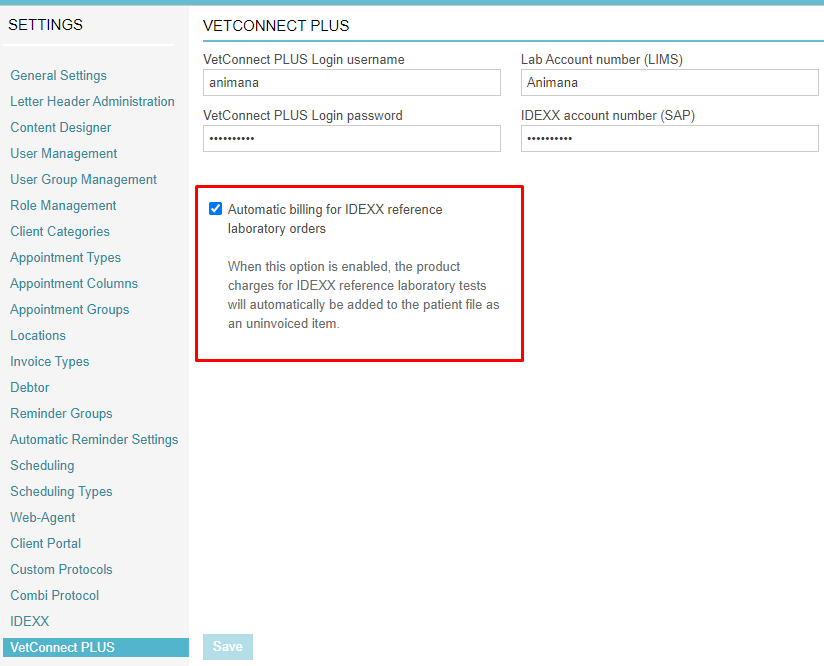
- Click Save at the bottom of the page.
- As soon as a Reference Laboratory test is ordered, the costs will be automatically billed to the client file.
- The product must have the product code completed with the correct IDEXX VetConnect Plus code. It’s a four letter code that can be found on the VetConnect Plus price list or in the ordering window itself.
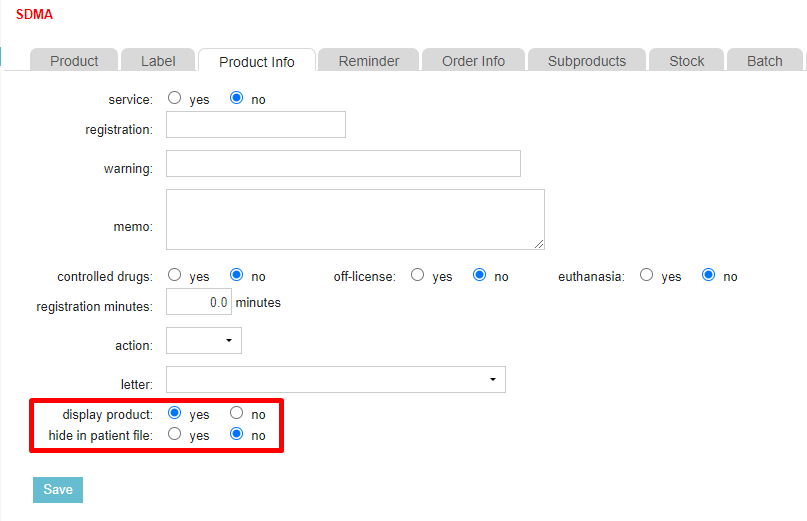
- The product must be active and in the tab Product the product must be set to show. That way only active and visible products are included.
- If there are multiple copies of the same product in your database, only the first correct match is selected.
- The selection is made on a complete match – this is to say if you have entered SDM instead of SDMA, automatic billing will not find the product.
Related articles
- How do I add products from a supplier? (Note: select IDEXX Reference Lab as supplier when adding IDEXX Reference Lab products)
- How do I Link VetConnect Plus with IDEXX Animana?
- How do I view VetConnect Plus lab results in Animana?