Animana allows you to define work schedules for each of your practice employees, allowing you to quickly identify in the diary who is working, so that you can schedule appointments for specific vets based on availability. This article will explain how you can add an employee’s work schedule in the diary.
Before you start
- You need to have permission to be able to manage scheduling. Permission for “scheduling” can be adjusted in
 > General Settings > Role Management.
 - Each Animana user that you wish to define a schedule for needs to have a diary colour or “colour in appointment columns” set against them. Please read more about this in the Changing the appointment column colour of an employee section.
Step-by-step instructions
- Go to > General Settings > Scheduling.
- To add a schedule, click
 on the row of the appropriate user.
This is box titlePlease note that the columns “Username”, “Name” and “Location” have text fields at the top where you can enter a search criteria. This might come in handy when you have many users in your account. - The scheduling diary is opened and – if the schedule for that user is empty – you will be prompted with the question to copy the users’ schedule from the previous week. Click Cancel to continue (as we’re adding a new schedule).
-
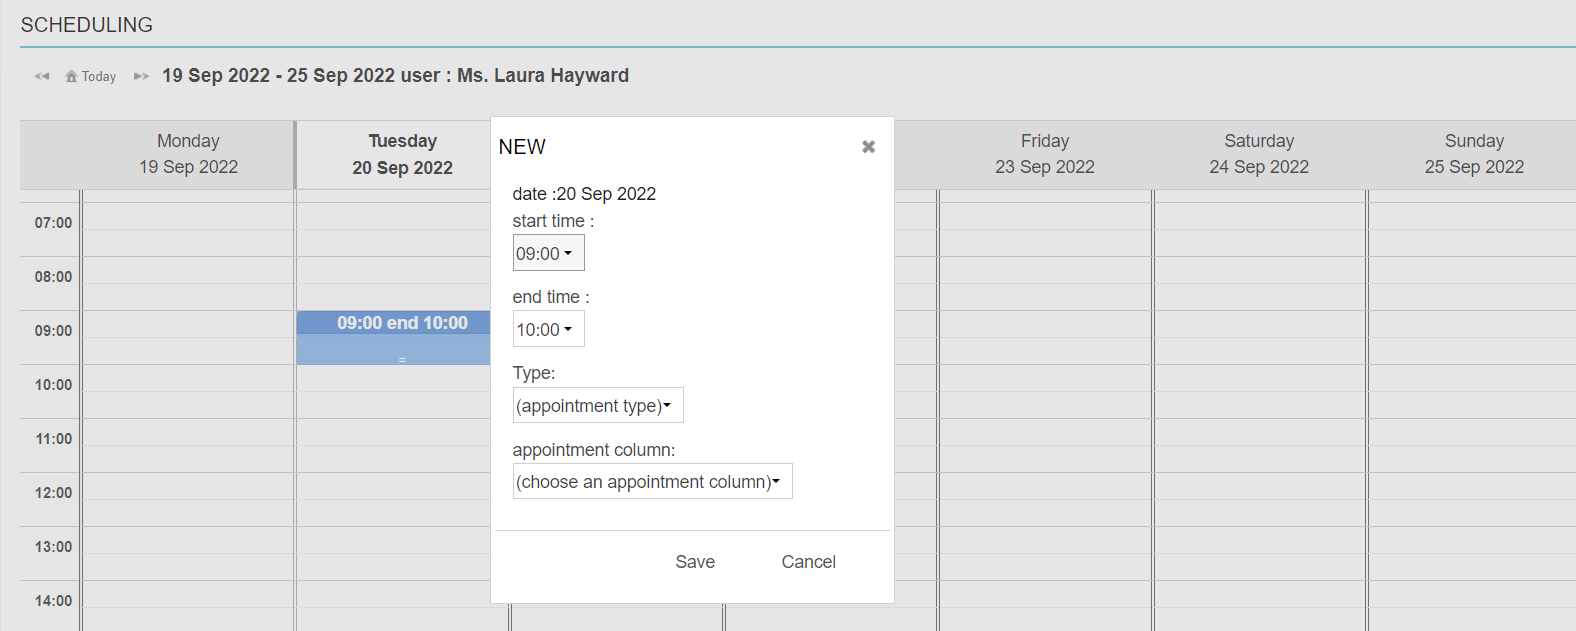
Click a day and time in the diary when this employee is scheduled. If necessary, you can navigate to a different week at the top.

-
Enter the “Start time” and “End time” in the drop-down menus.
This is box titleThe time slots are shown per half hour and cannot be made shorter. -
Leave the field “Type” as is.
-
Select an appointment column from the drop-down. This will determine in which column in the diary this user’s availability will show.
-
Click Save.
- Repeat until you have entered the entire week schedule for this employee.
When you return to the diary (e.g. via![]() ), you will see that the employee’s availability is now shown by means of a coloured column to the left of the diary group you selected earlier (shown below in purple).
), you will see that the employee’s availability is now shown by means of a coloured column to the left of the diary group you selected earlier (shown below in purple).
More about this
Multiple users scheduled at the same time
Sometimes, multiple users will be allocated the same appointment column at the same time, for instance when you schedule a veterinarian and a nurse in for surgery. In this case, both user colours will show in alternating colours (shown as purple and grey below). 
You can refer to the legend on the bottom-left of the diary to show which colour corresponds to which user. Should your practice use multiple agenda groups (diary tabs) with scheduling, you can tick the box “current view only” to only show the users for the current diary view in the legend.
Changing the appointment column colour of an employee
To change the colour of a scheduled employee on the calendar, proceed with the steps below.
- Go to > General Settings > Scheduling.
- Click in the colour box in the column “Colour in Appointment Column”.
- A colour selection box will appear. Select a colour by moving the black circle to your desired colour, or enter a colours’ ‘hex-code’ into the text box.
- Click Apply to save your changes.
How do I copy a week’s schedule?
Especially when you have fixed employee schedules, it is very easy to copy the schedule. Enter the week’s schedule as explained above. Then, at the top, click the double arrows to navigate to next week. You will be prompted with the question “week is empty, copy last week?”. Click OK and your entire schedule for that employee will be copied to the next week.
How do I delete a schedule?
A work schedule can change. If you need to change a schedule, follow steps 1-3 in the step-by-step description above. Then click the schedule that you wish to change. This will open the schedule details for that day. Click Delete at the bottom.