With custom protocols, you can simplify repetitive tasks by using a customised template. This comes in handy if you want to have a uniform treatment plan within your practice. Moreover, it will save you a lot of time. In this article we will explain how you can create a basic custom protocol.
Before you start
- Please note that the custom protocol feature called “octopus” needs to be enabled by our Customer Support team.
- You need permission to be able to create custom protocols. Permissions can be adjusted by practice administrators in
 > General Settings > Role Management.
Step-by-step instructions
To explain the basic functionality of a custom protocol we will create an example protocol for a consultation.
- In your account, go to > General Settings > Custom Protocols.
- At the top, click the button New Protocol.
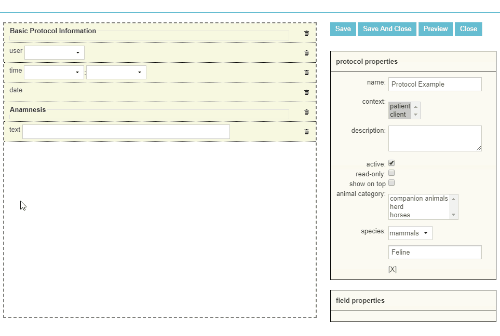
- In the “protocol properties” on the right, change the protocol name.
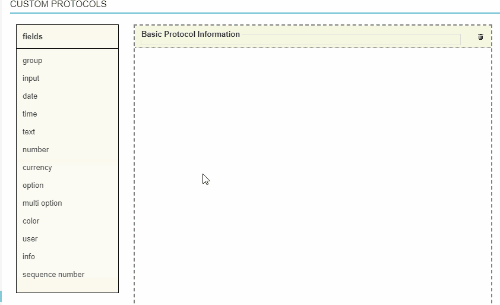
- On the left, you will see a column with available fields.This is box titleAs an example, we will add a grouped section containing basic information such as the date, time and the Animana user. Fields can be added by dragging and dropping the field from the left into the middle section of the page.
- Drag and drop the “group” field into the middle section like shown below. Note that here a “group” is a title and layout element.

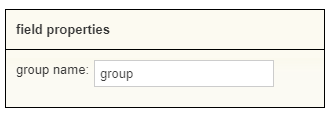
- Click on the group in the middle section. The “field properties” section will now appear on the bottom right side. Change the name of this group.
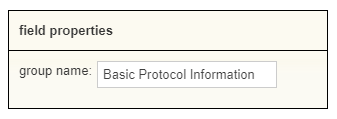
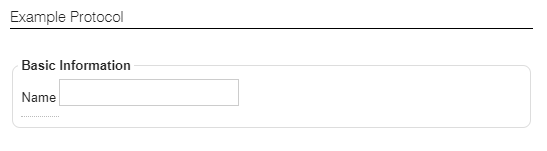
The name change of the group will be shown right away:

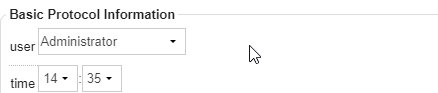
- Now that the group field has been set up, every other field that will be added will be included in this group. As an example, we will add fields for “date”, “time” and “user”, as follows:
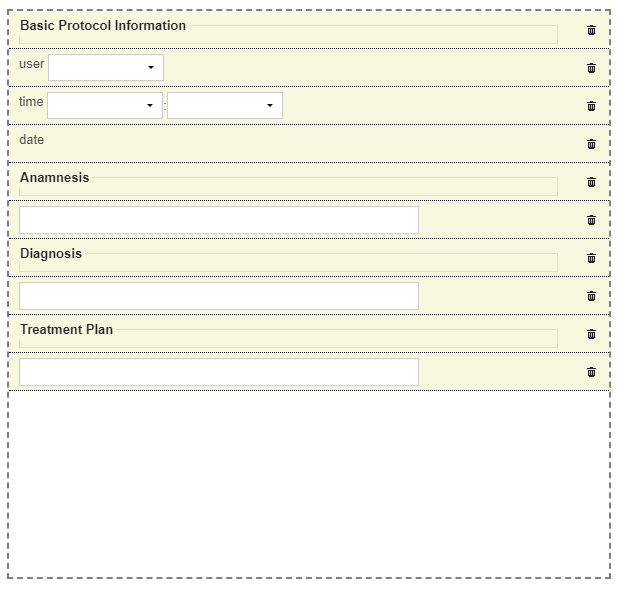
- In order to add a section for the Anamnesis, first add another group to the middle section and then change its name to “Anamnesis” on the right. If you forgot how to do this, go back to step 6 for a reminder.
- Then add a “text” field. The text field will be used as a field where the user can enter the anamnesis.
- Click on the field “text” and remove the name from the field properties.
If you want you can add groups and text fields in the same way for Diagnosis and Treatment Plan, which will make the protocol look similar to this:
- At the top right click Save:

After saving, the protocol will be added to the drop-down menu in the patient, herd or client file.
More about this
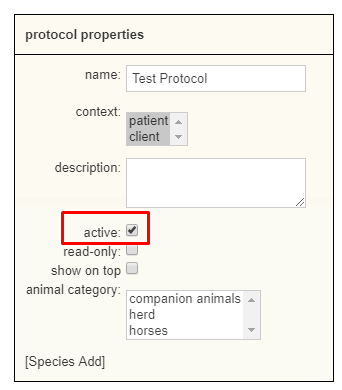
How do I make a protocol (in)active?
Every protocol has properties that can be set. One of them is to determine whether a protocol should be active or not. By ticking the active box that protocol will become active and when the box is unticked it will become inactive:
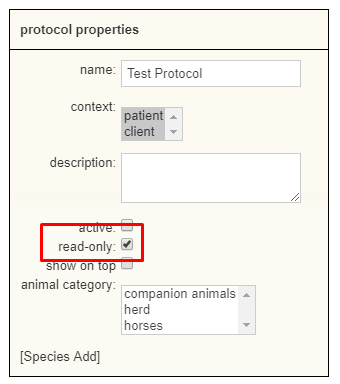
What does read-only mean?
When the read-only box in the protocol properties is ticked, the protocol will no longer appear in the dropdown menu in the client/patient file, so new protocols cannot be created using this template.
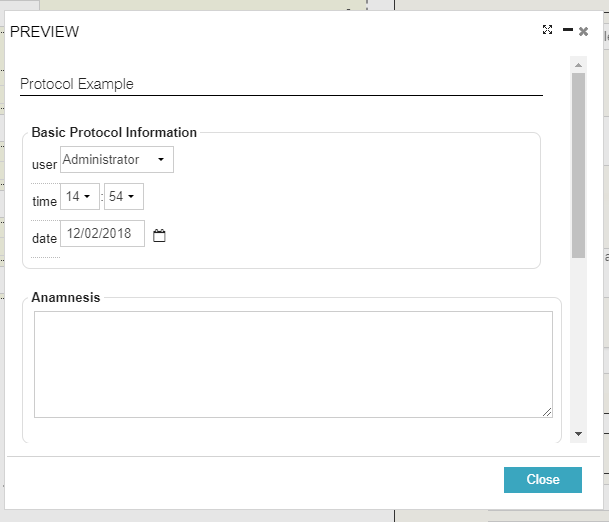
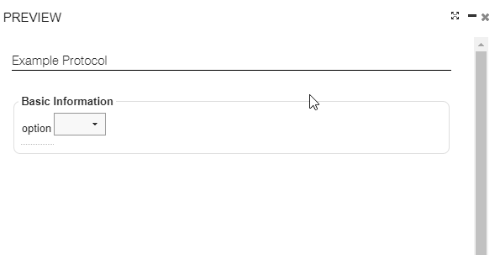
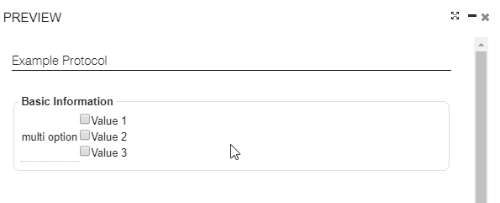
How can I preview a protocol?
While creating a new custom protocol, Animana provides the opportunity to preview the new protocol. Make sure to save the protocol first before you preview it. Previewing can be done by simply clicking on the Preview button at the top right:

Once clicked a pop-up with the protocol will appear:
How do I make sure a protocol sticks at the top of a client or patient file?
- Open a custom protocol by browsing to > General Setttings > Custom Protocols and selecting a protocol.
- On the right side under “Protocol properties” tick the Show on top box:

- Click Save and you are all set.
Customising fields
Every field of a custom protocol has its own properties. Please note that there are some common elements between these fields, one of these is the “tooltip” option:
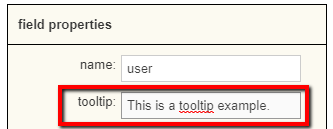
The tooltip will be displayed on the field once a mouse pointer is hovering over it. It can provide useful information for the user that is using the protocol:
Click on one of the options below to read more information on how they work.
This field can be used to group fields together. Fields added after a group will display inside the group until another group is added. Only the name of this field can be changed as shown below:
Adding a group creates a frame around that section in the protocol. The frame is printed.
This field generates a small input field. Can be perfectly used to enter names or short terms in the protocol, once entered it should look something like this:
The following properties are available:
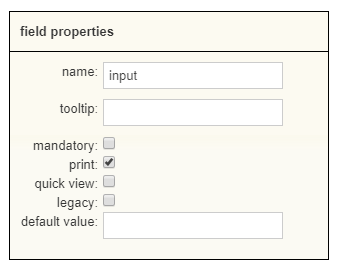
- Name: The text displayed for this field.
- Tooltip: Once a mouse pointer is hovering over this field, a little descriptive balloon will appear. This can be used to provide additional details or instructions regarding this field.
- Mandatory: Indicate whether this field is required to complete the protocol. When marked, a protocol cannot be saved without entering information in this field.
- Print: Indicate whether this field needs to be shown when the protocol is printed.
- Quick view: Enable the ability to have this information shown in the patient file overview. Allows the user to quickly access/view the details of the protocol.
- Legacy: Mention whether this field was previously available, but has been disabled. This will disable the field in the protocol. Deleting a field in a protocol will delete all previous entries of it, so make sure to check this box if you no longer want to use this field in future protocols but want to retain the old entries.
- Default value: This field can be used if you want to have a pre-written (placeholder) text appear.
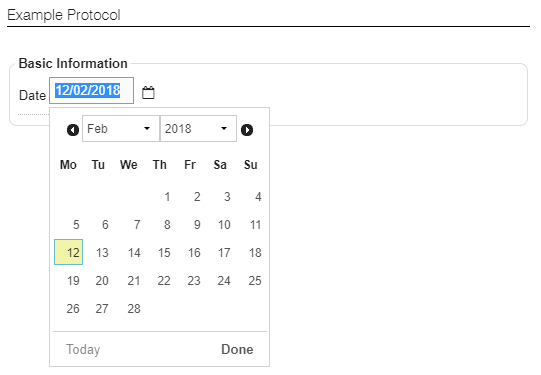
The date field enables the user to add a date to the protocol as shown below:
The following properties are available:
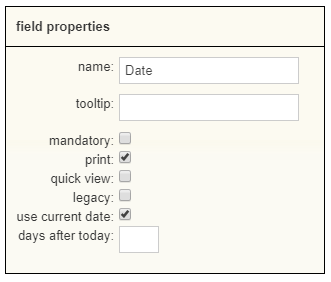
- Name: The text displayed for this field.
- Tooltip: Once a mouse pointer is hovering over this field, a little descriptive balloon will appear. This can be used to provide additional details or instructions regarding this field.
- Mandatory: Indicate whether this field is required to complete the protocol. When marked, a protocol cannot be saved without entering information in this field.
- Print: Indicate whether this field needs to be shown when the protocol is printed.
- Quick view: Enable the ability to have this information shown in the patient file overview. Allows the user to quickly access/view the details of the protocol.
- Legacy: Mention whether this field was previously available, but has been disabled. This will disable the field in the protocol. Deleting a field in a protocol will delete all previous entries of it, so make sure to check this box if you no longer want to use this field in future protocols but want to retain the old entries.
- Use current date: When this box is checked, it will automatically add the current date to the form.
- Days after today: If needed, the date can also be set to a day in the future or past as soon as the protocol is created.
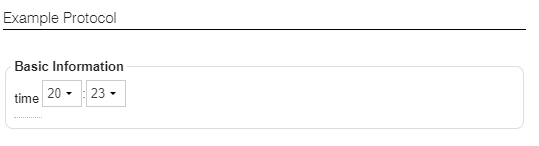
The time field enables the user to add a time to the protocol as shown below:
The following properties are available:
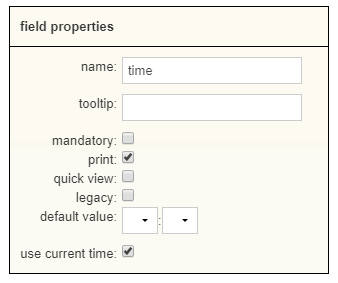
- Name: The text displayed for this field.
- Tooltip: Once a mouse pointer is hovering over this field, a little descriptive balloon will appear. This can be used to provide additional details or instructions regarding this field.
- Mandatory: Indicate whether this field is required to complete the protocol. When marked, a protocol cannot be saved without entering information in this field.
- Print: Indicate whether this field needs to be shown when the protocol is printed.
- Quick view: Enable the ability to have this information shown in the patient file overview. Allows the user to quickly access/view the details of the protocol.
- Legacy: Mention whether this field was previously available, but has been disabled. This will disable the field in the protocol. Deleting a field in a protocol will delete all previous entries of it, so make sure to check this box if you no longer want to use this field in future protocols but want to retain the old entries.
- Default value: Enter a pre-determined time if that is needed.
- Use current time: Animana will automatically add the current time when this protocol is created.
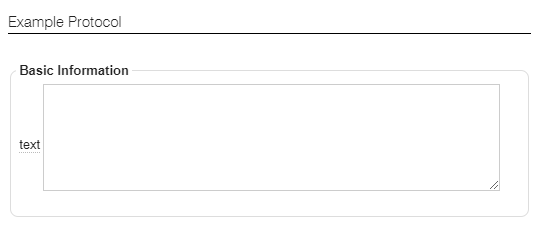
The text field adds a text block where information can be stored.
The following properties are available:
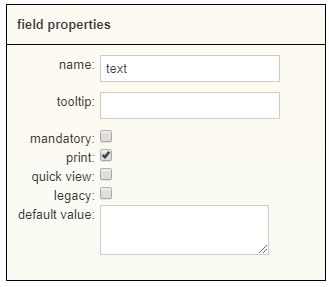
- Name: The text displayed for this field.
- Tooltip: Once a mouse pointer is hovering over this field, a little descriptive balloon will appear. This can be used to provide additional details or instructions regarding this field.
- Mandatory: Indicate whether this field is required to complete the protocol. When marked, a protocol cannot be saved without entering information in this field.
- Print: Indicate whether this field needs to be shown when the protocol is printed.
- Quick view: Enable the ability to have this information shown in the patient file overview. Allows the user to quickly access/view the details of the protocol.
- Legacy: Mention whether this field was previously available, but has been disabled. This will disable the field in the protocol. Deleting a field in a protocol will delete all previous entries of it, so make sure to check this box if you no longer want to use this field in future protocols but want to retain the old entries.
- Default value: This field can be used if you want to have a pre-written text to appear.
The number field adds a box where a numeric value can be entered: 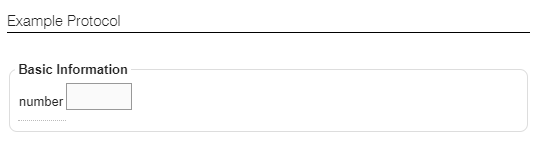
The following properties are available:

- Name: The text displayed for this field.
- Tooltip: Once a mouse pointer is hovering over this field, a little descriptive balloon will appear. This can be used to provide additional details or instructions regarding this field.
- Mandatory: Indicate whether this field is required to complete the protocol. When marked, a protocol cannot be saved without entering information in this field.
- Print: Indicate whether this field needs to be shown when the protocol is printed.
- Quick view: Enable the ability to have this information shown in the patient file overview. Allows the user to quickly access/view the details of the protocol.
- Legacy: Mention whether this field was previously available, but has been disabled. This will disable the field in the protocol. Deleting a field in a protocol will delete all previous entries of it, so make sure to check this box if you no longer want to use this field in future protocols but want to retain the old entries.
- Decimals: Mention if the entered number in this field needs be displayed with decimals. The amount of numbers you put in the field is the amount digits that will be shown after the comma.
- Default value: Enter a pre-determined number if needed.
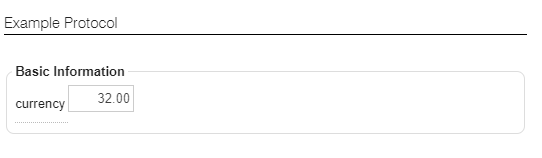
The currency field adds a box where a currency amount can be entered:
The following properties are available:
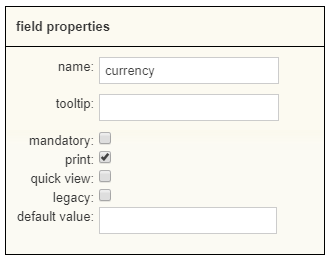
- Name: The text displayed for this field.
- Tooltip: Once a mouse pointer is hovering over this field, a little descriptive balloon will appear. This can be used to provide additional details or instructions regarding this field.
- Mandatory: Indicate whether this field is required to complete the protocol. When marked, a protocol cannot be saved without entering information in this field.
- Print: Indicate whether this field needs to be shown when the protocol is printed.
- Quick view: Enable the ability to have this information shown in the patient file overview. Allows the user to quickly access/view the details of the protocol.
- Legacy: Mention whether this field was previously available, but has been disabled. This will disable the field on the protocol. Deleting a field in a protocol will delete all previous entries of it, so make sure to check this box if you no longer want to use this field in future protocols but want to retain the old entries.
- Default value: Enter a pre-determined amount if that is needed.
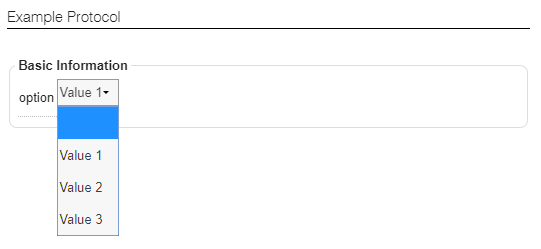
The option field gives the ability to add a dropdown menu with multiple values, but the user can only select one:
The following properties are available:
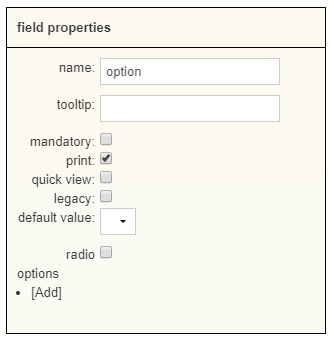
- Name: The text displayed for this field.
- Tooltip: Once a mouse pointer is hovering over this field, a little descriptive balloon will appear. This can be used to provide additional details or instructions regarding this field.
- Mandatory: Indicate whether this field is required to complete the protocol. When marked, a protocol cannot be saved without entering information in this field.
- Print: Indicate whether this field needs to be shown when the protocol is printed.
- Quick view: Enable the ability to have this information shown in the patient file overview. Allows the user to quickly access/view the details of the protocol.
- Legacy: Mention whether this field was previously available, but has been disabled. This will disable the field in the protocol. Deleting a field in a protocol will delete all previous entries of it, so make sure to check this box if you no longer want to use this field in future protocols but want to retain the old entries.
- Default value: Enter a value that needs to be entered in this field. Please note that this option can only be used as soon as the values are defined in the section “options” below.
- Radio: If there is a desire to use small radio buttons instead of a dropdown menu, make sure to tick this box. Note that as with a drop-down menu, only one item can be selected.
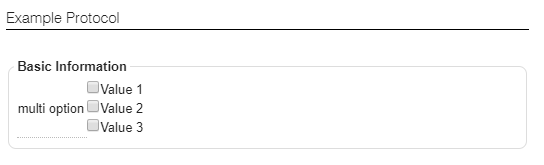
- Options: Click [Add] to add values to the dropdown/radiobutton menu. These values can be used as shown below:
With the multi option field, you will be able to add multiple choices, a user can select multiple values:
The following properties are available:
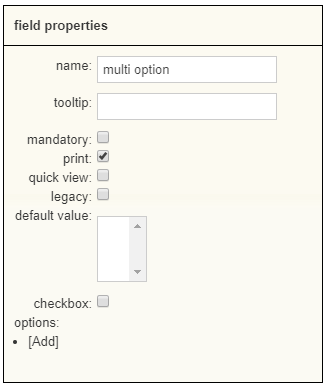
- Name: The text displayed for this field.
- Tooltip: Once a mouse pointer is hovering over this field, a little descriptive balloon will appear. This can be used to provide additional details or instructions regarding this field.
- Mandatory: Indicate whether this field is required to complete the protocol. When marked, a protocol cannot be saved without entering information in this field.
- Print: Indicate whether this field needs to be shown when the protocol is printed.
- Quick view: Enable the ability to have this information shown in the patient file overview. Allows the user to quickly access/view the details of the protocol.
- Legacy: Mention whether this field was previously available, but has been disabled. This will disable the field in the protocol. Deleting a field in a protocol will delete all previous entries of it, so make sure to check this box if you no longer want to use this field in future protocols but want to retain the old entries.
- Default value: Enter a value that needs to entered in this field. Please note that this option can only be used as soon as the values are defined in the section “options” below.
- Checkbox: If there is a desire to use boxes instead of a selection menu, make sure to tick this box.
- Options: Use [Add] to add values to the dropdown/selection menu. These values can be used as shown below:
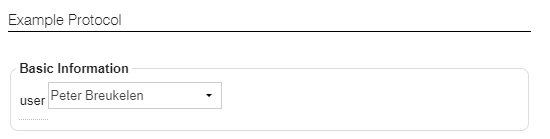
With the user field, you will be able to select an Animana user and that user will be displayed on the protocol:
The following properties are available:
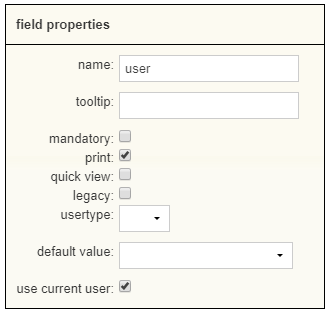
- Name: The text displayed for this field.
- Tooltip: Once a mouse pointer is hovering over this field, a little descriptive balloon will appear. This can be used to provide additional details or instructions regarding this field.
- Mandatory: Indicate whether this field is required to complete the protocol. When marked, a protocol cannot be saved without entering information in this field.
- Print: Indicate whether this field needs to be shown when the protocol is printed.
- Quick view: Enable the ability to have this information shown in the patient file overview. Allows the user to quickly access/view the details of the protocol.
- Legacy: Mention whether this field was previously available, but has been disabled. This will disable the field in the protocol. Deleting a field in a protocol will delete all previous entries of it, so make sure to check this box if you no longer want to use this field in future protocols but want to retain the old entries.
- Usertype: The option is given to select only the vets or nurses in your Animana account. This means that the user that is creating the protocol, will only have a list of names of the users that are in the Vet or/and Nurse role.
- Default value: Select the name of a user if that user needs to be filled in automatically in this field.
- Use current user: Tick this box if the name of the current user should appear in this field.
The colour field can be used in context with patient information, this field will inherit the same colour options as in patientdata.
The following properties are available:
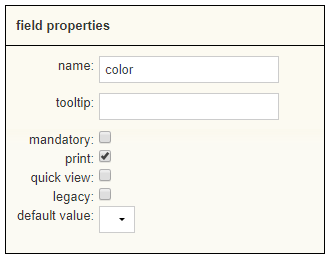
- Name: The text displayed for this field.
- Tooltip: Once a mouse pointer is hovering over this field, a little descriptive balloon will appear. This can be used to provide additional details or instructions regarding this field.
- Mandatory: Indicate whether this field is required to complete the protocol. When marked, a protocol cannot be saved without entering information in this field.
- Print: Indicate whether this field needs to be shown when the protocol is printed.
- Quick view: Enable the ability to have this information shown in the patient file overview. Allows the user to quickly access/view the details of the protocol.
- Legacy: Mention whether this field was previously available, but has been disabled. This will disable the field in the protocol. Deleting a field in a protocol will delete all previous entries of it, so make sure to check this box if you no longer want to use this field in future protocols but want to retain the old entries.
- Default value: Select the colour of the patient that needs to be filled in automatically in this field.
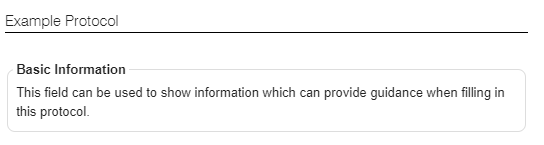
The info field can be used to provide more guidance in a protocol. This is a text area that cannot be changed when the protocol is being created.
The following properties are available:

- Name: The text displayed for this field.
- Print: Indicate whether this field needs to be shown when the protocol is printed.
- Display: This checkbox makes sure that the information entered in the info field is shown on the protocol.
- Info: Here you will be able to add the text information.
When this field is used a unique, increasing sequence number will be generated for each protocol created.
The following properties are available:
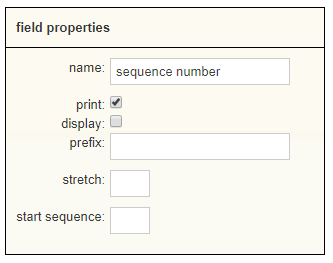
- Name: The text displayed for this field.
- Print: Indicate whether this field needs to be shown when the protocol is printed.
- Prefix: The letter the sequence number can start with. You can compare this to the “S-” invoices in Animana.
- Stretch: The total amount of digits the sequence has to contain. When 5 is entered it would show 00001.
- Start sequence: The number that the sequence has to start with. If 8 has been entered and the stretch value is 5, it would start with 00008.
What is the logic of the order in which my protocol appears in the drop-down menu?
Basically, the order of protocols in the drop-down menu is alphabetical, i.e. from top to bottom from a to z. It is possible to adjust the order of the protocols in the drop-down menu or move frequently used custom protocols to the action buttons at the top of the file. More information can be found in the related articles below.