IDEXX Animana offers an integration with IDEXX SmartFlow. This article will explain how you can set up the integration.
Before you start
- You need to have a SmartFlow account in order to set up the integration. Contact one of our account managers for more information.
- You need permission to be able to manage SmartFlow settings. Permissions can be adjusted by practice administrators in
 > General Settings > Role Management.
Step-by-step instructions
- Go to > General Settings > SmartFlow.
- At the top, select your practice location in the drop-down by “location name”.
- In the field next to it, add the SmartFlow API key as found in your SmartFlow account for that specific location:
 This is box titlePlease note that you can only use one SmartFlow API key per practice location defined in Animana. Other locations will not have the option to send patient information to SmartFlow, unless the other locations have their own SmartFlow API key set.
 - Click Add.
- Select whether you want to link to appointment status, and if you want to include phone/e-mail or address. More about this.
- Click Save at the bottom of the location table.
More about this
What does “linking to appointment status” do?
When you select the “Link to appointment status” option, appointments will show the SmartFlow indicator in the diary, for users logged in to a location that has this setting active.
Also, as soon as the appointment status of a patient changes to “arrived”, Animana will immediately send the patient information to SmartFlow.
What does “include phone/e-mail/address” do?
- When you select the “include phone” option, the client’s phone number (in their Animana Client Data) will be sent to SmartFlow along with the patient information. Note that only one phone number will be sent to SmartFlow, and the phone type “phone mobile” is prioritised over all other types.
- When you select the “include e-mail” option, the client’s first e-mail address (in their Animana Client Data) will be sent to SmartFlow along with the patient information.
- When you select the “include address” option, the client’s street, house number, city, county and postcode (in their Animana Client Data) will be sent to SmartFlow along with the patient information.
After clicking Save, the next patient that is sent to SmartFlow will include the selected information.
How do I sync my Animana products with SmartFlow?
See the related articles below for the link to a dedicated article explaining how to sync your products.
How do I automatically add treatments from SmartFlow to Animana?
It is also possible to send treatments that were added to a patient in SmartFlow, into Animana. These treatments will automatically be added to the patient file in Animana under the “Uninvoiced” tab. However, this functionality needs to be enabled in your SmartFlow account. Proceed with the following steps to enable this feature:
- Log in to your SmartFlow account.
- Hover over the profile icon and click Settings.
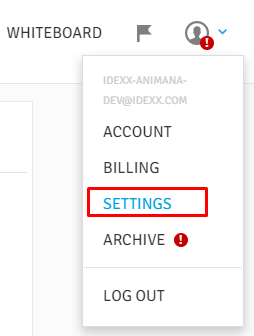
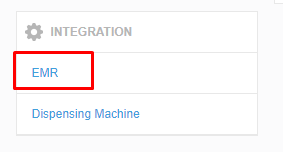
- Scroll to the bottom until you see the section “Integration”.
- Click on EMR
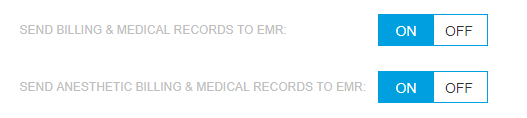
- Make sure that the toggles are set to “On” for the settings “SEND BILLING & MEDICAL RECORDS TO EMR” and “SEND ANESTHETIC BILLING & MEDICAL RECORDS TO EMR”: