Securing data stored in Animana is a high priority. This article will focus on ensuring that only the right people have the ability to access Animana. Instructions will be given on how to make sure that a user is able to log in to Animana only from a certain network (IP address) on your network. For example, you may want users to only be able to log in from within your practice – in this case, Animana will be configured to only accept users that from an IP address within your clinic.
Before you start
This is box title
- It is always wise to have someone with the right technical knowledge to perform these actions for you. If you are not capable of doing so, please get in touch with your IT Administrator.
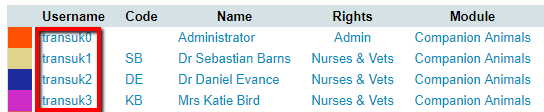
- If you are going to use this functionality, make sure that at least one user can always log in from any IP address (by default this is the admin user, the username of this user will always end with 0, unless changes have been made by you). If your Internet Service Provider decides to changes the IP address of your internet connection, you do want to keep your access to IDEXX Animana so you can make any changes afterwards.
Step-by-step instructions
- Browse to
 > General Settings > User Management.
 - The “Check on IP” feature needs to be enabled for each user. Click on the user that needs to be edited:
- On the right-side, enable the “Check on IP” feature by selecting Yes:
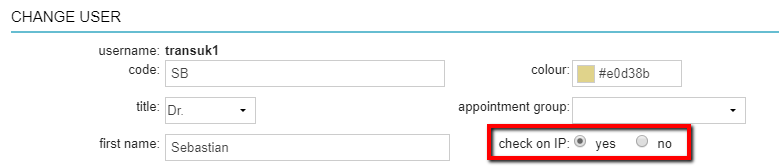
- Note the Username of this user, this will be required later in this process.
- Click Save at the bottom of the page.
This is box titleNote that in order to save these changes, an authentication e-mail address must have been entered. - The employee overview page will now be shown, note which users have the “Check on IP” feature enabled by the green checkmark:

- At the bottom of this overview, click Add IP-Address:

- By default, Animana will show the IP Address that you are currently logged in from:
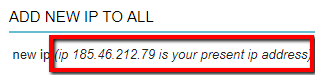
If this is not the correct IP Address you want to assign, make sure to identify the correct one before assigning it to a user. - In this instance, the IP address will be assigned to only one user. Select the correct user from the dropdown list:

- Click Save.
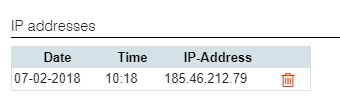
- The IP Address has now been assigned to this user, which can be seen in the overview:
 The IP Address will also be visible if you open the user details (
 > General Settings > User Management) and then scroll down to the bottom of the user details page:
- If you wish, each user can be assigned multiple IP addresses – thus allowing controlled log in from several known locations. To add multiple addresses, simply repeat steps 6 to 11 above