If you need to create multiple financial statements for multiple clients at the same time, you might want to have a look at the batch statements functionality. This functionality enables you to create multiple PDF statements from the Outstanding Invoices page.
Before you start
- Make sure that Statements have been enabled in your account by Animana Customer Support.
- In order to access the Outstanding Invoices page you need to have a role which has one (or more), of the following permissions;
- A role that includes the “Financial – debtors” permission,
- A role that includes the “Financial – full access to financial” permission,
- A role that includes the “Full Access” permission.
- If you don’t have the appropriate permissions, please ask your Animana administrator if they can assign the permissions to your account via
 > General Settings > Role Management.
Step-by-step instructions
- Go to
 > Financial > Outstanding Invoices
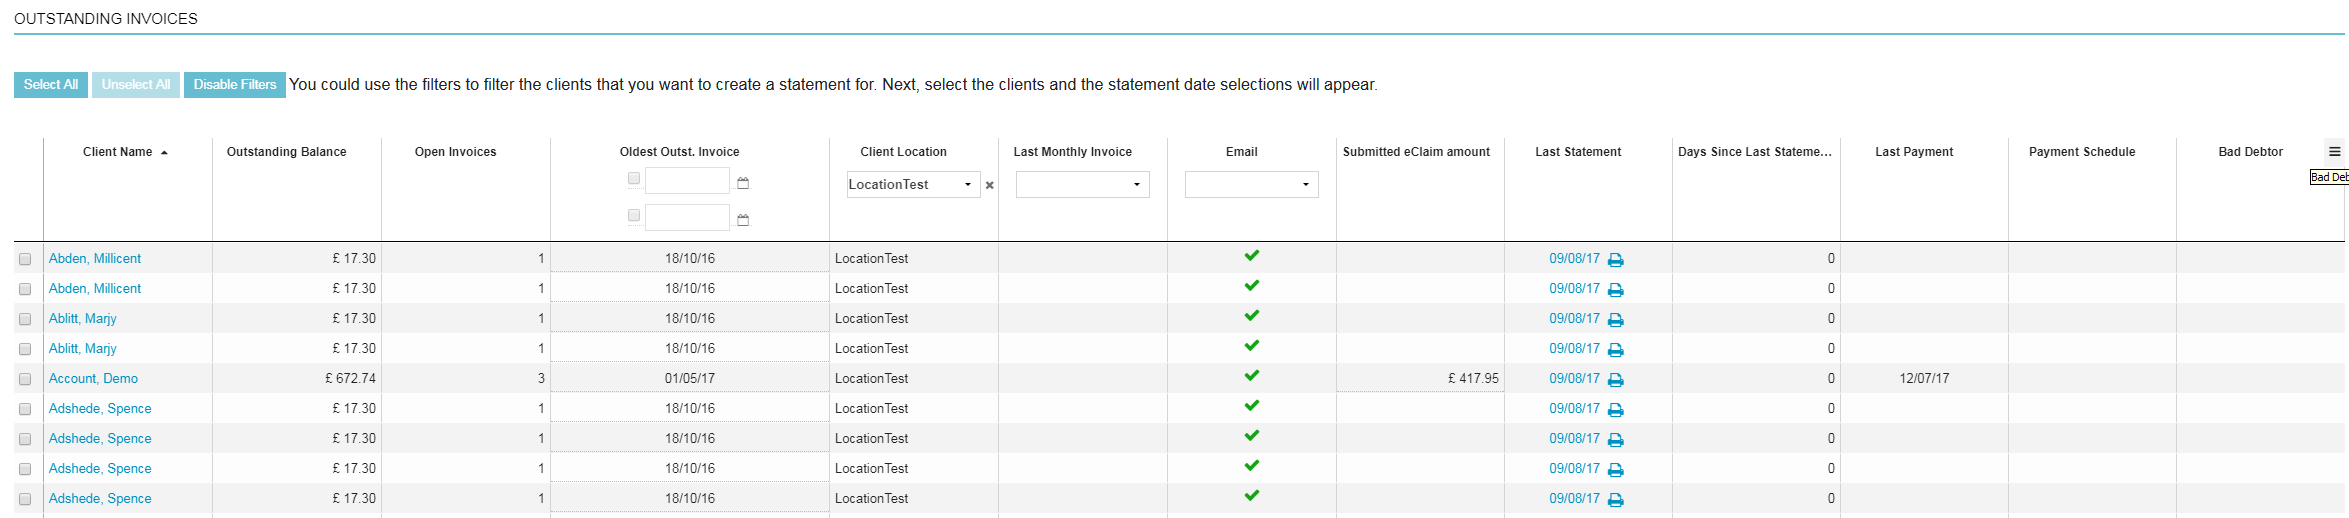
 - You will arrive at a page similar to this:
-
Select the clients you want to create the statements for by ticking the box(es) on the left side:

- Extra options at the top of this page will appear once you selected one or multiple clients:
 Here you will be able to select and/or change a date range, whether payments should be aggregated, and the date of when the Statement was/will be issued to the client.
 - Also note that if you want to create statements for a large selection of clients, you can make use of the Select All or Unselect All buttons.
 Alternatively, hold down Shift and tick a box to select every client from the last ticked box until the box you now ticked.
 - By default the “Client Name” column will be alphabetically sorted, which will be indicated by the black arrow:

You are able to sort all the columns listed on this page by clicking on them.
- Here is an overview of all the columns available:
Client nameThe company or client name. Click on the name to go straight to the client file.Outstanding BalanceThe total open balance for the client. This is the total of all sales invoices (including VAT), minus any booked payment differences, minus any payments made against all sales invoices.Open invoicesThe total number of outstanding invoices.Oldest Outstanding InvoiceShows the date of the oldest outstanding invoice. You can use this column to filter on oldest outstanding invoice by entering a date in the column header.Client LocationThis column allows you to filter which of your practices that the client is registered to.Last Monthly InvoiceThe date of which the client received the last monthly invoice.EmailThis columns confirms whether the user has an email address on the Client Data page.Submitted eClaim AmountDisplays how much has been claimed through eClaim.Last StatementThe date the last statement was created for the client. Click on the date to view the statement as a PDF in Adobe Acrobat.Days since last statementThe number of days since the last statement was created.Last PaymentThe date the most recent payment was made against any invoice for this client.Payment ScheduleThis indicates that the client is flagged as being on a payment schedule as defined in Client Data > Financial.Bad DebtorThis indicates that the client is flagged as a bad debtor in Client Data > Financial. - The
 -icon at the top right corner, allows you to add or remove columns from this page:
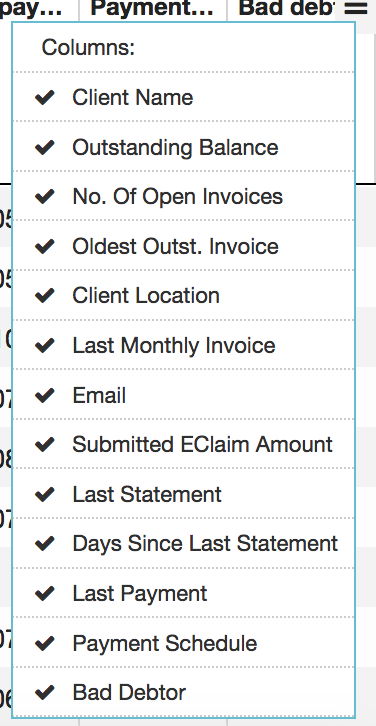
Columns with a tick on the left side will be visible. Columns with a cross will not be visible.
-
Once you have made the appropriate selection, click Create Batch.
This is box titleWhen creating a batch statement, all the files will be compressed into a single .zip file. The .zip file will contain all the PDF’s. These PDF’s will hold up 50 statements per file. For example: If you have created 200 statements, these statements will be spread over 4 separate PDF’s.
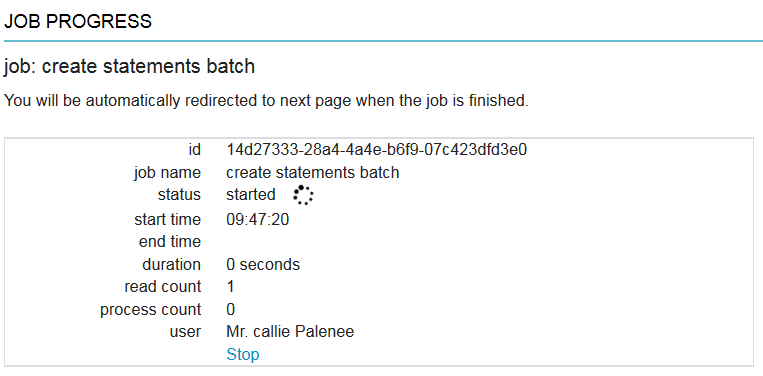
- A pop-up will appear asking if you want to create the statements for the selected clients. Click Yes.
- You will see a Job Progress report.
-
Once the statements have been created, you will be directed to the “Statement Batches” page. This page will display a list of statement batches created:

Here is a detailed explanation as to what the columns on this page are displaying:Creation DateThe date the statement batch was created.Start DateThe start date for this batch.End DateShows the end date of the date range.Statement DateShows the date when the statement was/will be issued to the client.Aggregated PaymentsTells if payments are aggregated on the statements.UserShows which Animana user has created this report.ActionsGives the opportunity to save the statement batch in a .zip file or to delete the batch. - Once the statements have been created, every selected client will have a statement entry added to their Client File:

More about this
How do I download the statement batch?
- In order to download the statements, click on the
 icon and save the file to a location on your computer.
 - A .zip file will be downloaded to your computer which will contain all the statements.
How do I access previously created statement batches?
- To view previously created statement batches go to > Financial > Outstanding Invoices > Statement Batches.
- Here you will be able to see the previously created statement batches where you can either download (by using the icon), or delete (by using the
 icon) the batches.