Appointments are booked in your calendar throughout the day. In Animana, appointments can be made in three ways: either directly from the diary, or from the client/patient file, or a client books an appointment online at your practice (if you are using an online appointment booking system). This article explains how to create an appointment from the patient file.
Before you start
This is box title
Make sure that your appointment columns, appointment types and appointment groups have been customised in your account before continuing. See the Related articles section for more information related to this topic.
Step-by-step instructions
- Go to the patient file.
- At the top of the patient file, click the Appointment button. Depending on your settings, you will find this option either in the row of blue action buttons or in the “More actions” drop-down menu at the top left of the file.
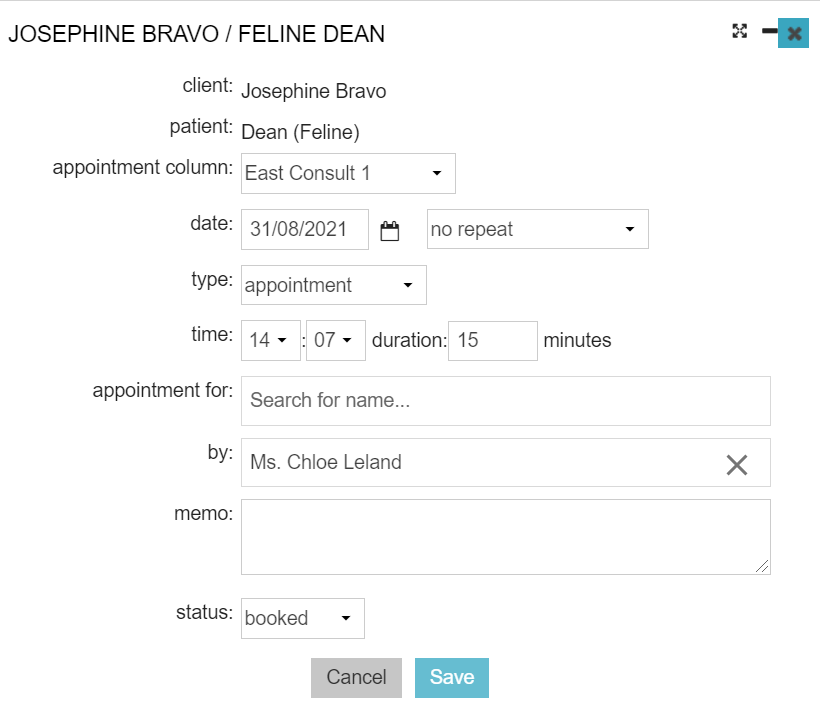
- This will create an appointment pop-up pre-populated with the client and the patient details.

- Select the appropriate “appointment column” .
- The “date” field will be populated with today’s date. To change the date either type the new date in the correct format (DD-MM-YYYY), or click on the
 -icon to bring up the date-picker. If you want to create a recurring appointment, see the related articles.
 - Select the appropriate “type” of appointment. Appointment types have defined descriptions and durations and can be colour coded. They can be defined in Settings > General Settings > Appointment Types.
- Change the time to the time of the appointment.
- The appointment “duration” field is pre-populated with the duration as defined for the appointment type you have selected in step 6. You can manually adjust the duration by entering a new value.
- If you are making an appointment on behalf of another employee, enter their name in the “appointment for” field. As soon as you enter one character, Animana will show you a drop-down with matches for you to pick from. Select the colleague you want to assign.
- By default, you will be automatically added as the creator of the appointment in the field “by”. In case you want to change the information, click on the X by your name and enter a different user.
- You can add a simple memo or text comment to the appointment in the “memo” field.
- Click Save.
Related articles
- Learning Path: Diary Management
- How do I set up Animana for online appointment booking through Vetstoria?
- How do I create an appointment from the diary?
- How do I create a recurring appointment?
- How do I send an appointment reminder from the diary?
- How do I set up Appointment Columns?
- How do I set up and manage Appointment Groups?
