Many patients have a microchip or will receive one in your practice. This article describes how to register a microchip with VetEnvoy directly from the patient file in Animana.
Before you start
This is box title
- Before you can start registering microchips, you will need an account with VetEnvoy. Should you not have one yet you can go to: https://www.vetenvoy.net/signup/
- Once you have received a username and password from VetEnvoy you can contact the IDEXX Animana support team. They will activate the VetEnvoy plugin for you.
Step-by-step instructions
- Go to the patient file.
- In the Patient Data tab, in the “Identification” section, check that the patient has a microchip number entered. If they do not, add it now. See more about this.
- Go (back) to the Patient File tab.
- Click on the drop-down menu in the patient file.
- Scroll down to select “vetenvoy” in the plugins section.
- A new screen will open. Check the fields that have been filled correctly, and complete the remaining fields.
- Click Save.
- Indicate if you want to receive e-mails from VetEnvoy and state that you are authorised by checking the “Authorisation” box.
Should you have agreed to receive e-mails from VetEnvoy you will receive a confirmation e-mail for the microchip registration. - Click Next.
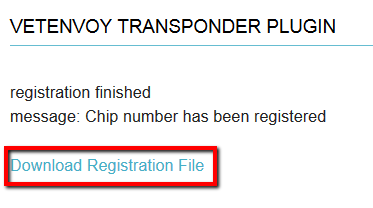
- You will see a notification that the chip number has been registered.
This is box title
VetEnvoy always sends the certificate directly to the owner of the pet, so you do not need to print a copy. Should you want to, you can click on “Download Registration File” as shown above.
More about this
How do I add a microchip to the Patient Data?
- Go to the patient file.
- Click the Patient Data tab in the top right.
- Scroll down to the “identification” box and click Add.
This is box titleWhen you have made changes to the patient data before clicking Add, a popup will ask you if you want to save the patient data changes before continuing. Click Save and continue if you want to save your changes. - In the next screen, under “Type of ID” select “microchip number”.
- In the second field, add the date that the microchip was inserted.
- In the field “ID number” enter the microchip number. You can use a scanner to fill this field.
- In the field “position” you can add where specifically on the patient´s body the microchip was inserted.
- Use the field “Administered by” to select which veterinarian has performed the microchipping.
This is box titleIf the name of the veterinarian is not in the list, check that in the user management settings, their usertype is set to “vet”. See the related articles. - Click Save or Save and Add ID if you want to add another identification.
You will see the identification added to the list of patient identifications.
Which microchip companies does VetEnvoy support?
Here you can find a list of microchip companies that VetEnvoy supports: https://www.vetenvoy.com/our-partners/#microchip