When new clients are added to the system, their pet(s) also need to be added. This article will explain how you can add a new patient to the system.
Before you start
This is box title
- Before adding a new patient, it is good practice to check that the patient is not already in the system.
- Before you can add a patient, you need to add the owner into the system first. See the Related articles below on how to add a contact.
Step-by-step instructions
- Search for the client and then click the tab Animals.
- Click the button New Patient.
- You will now see the main add new patient window.
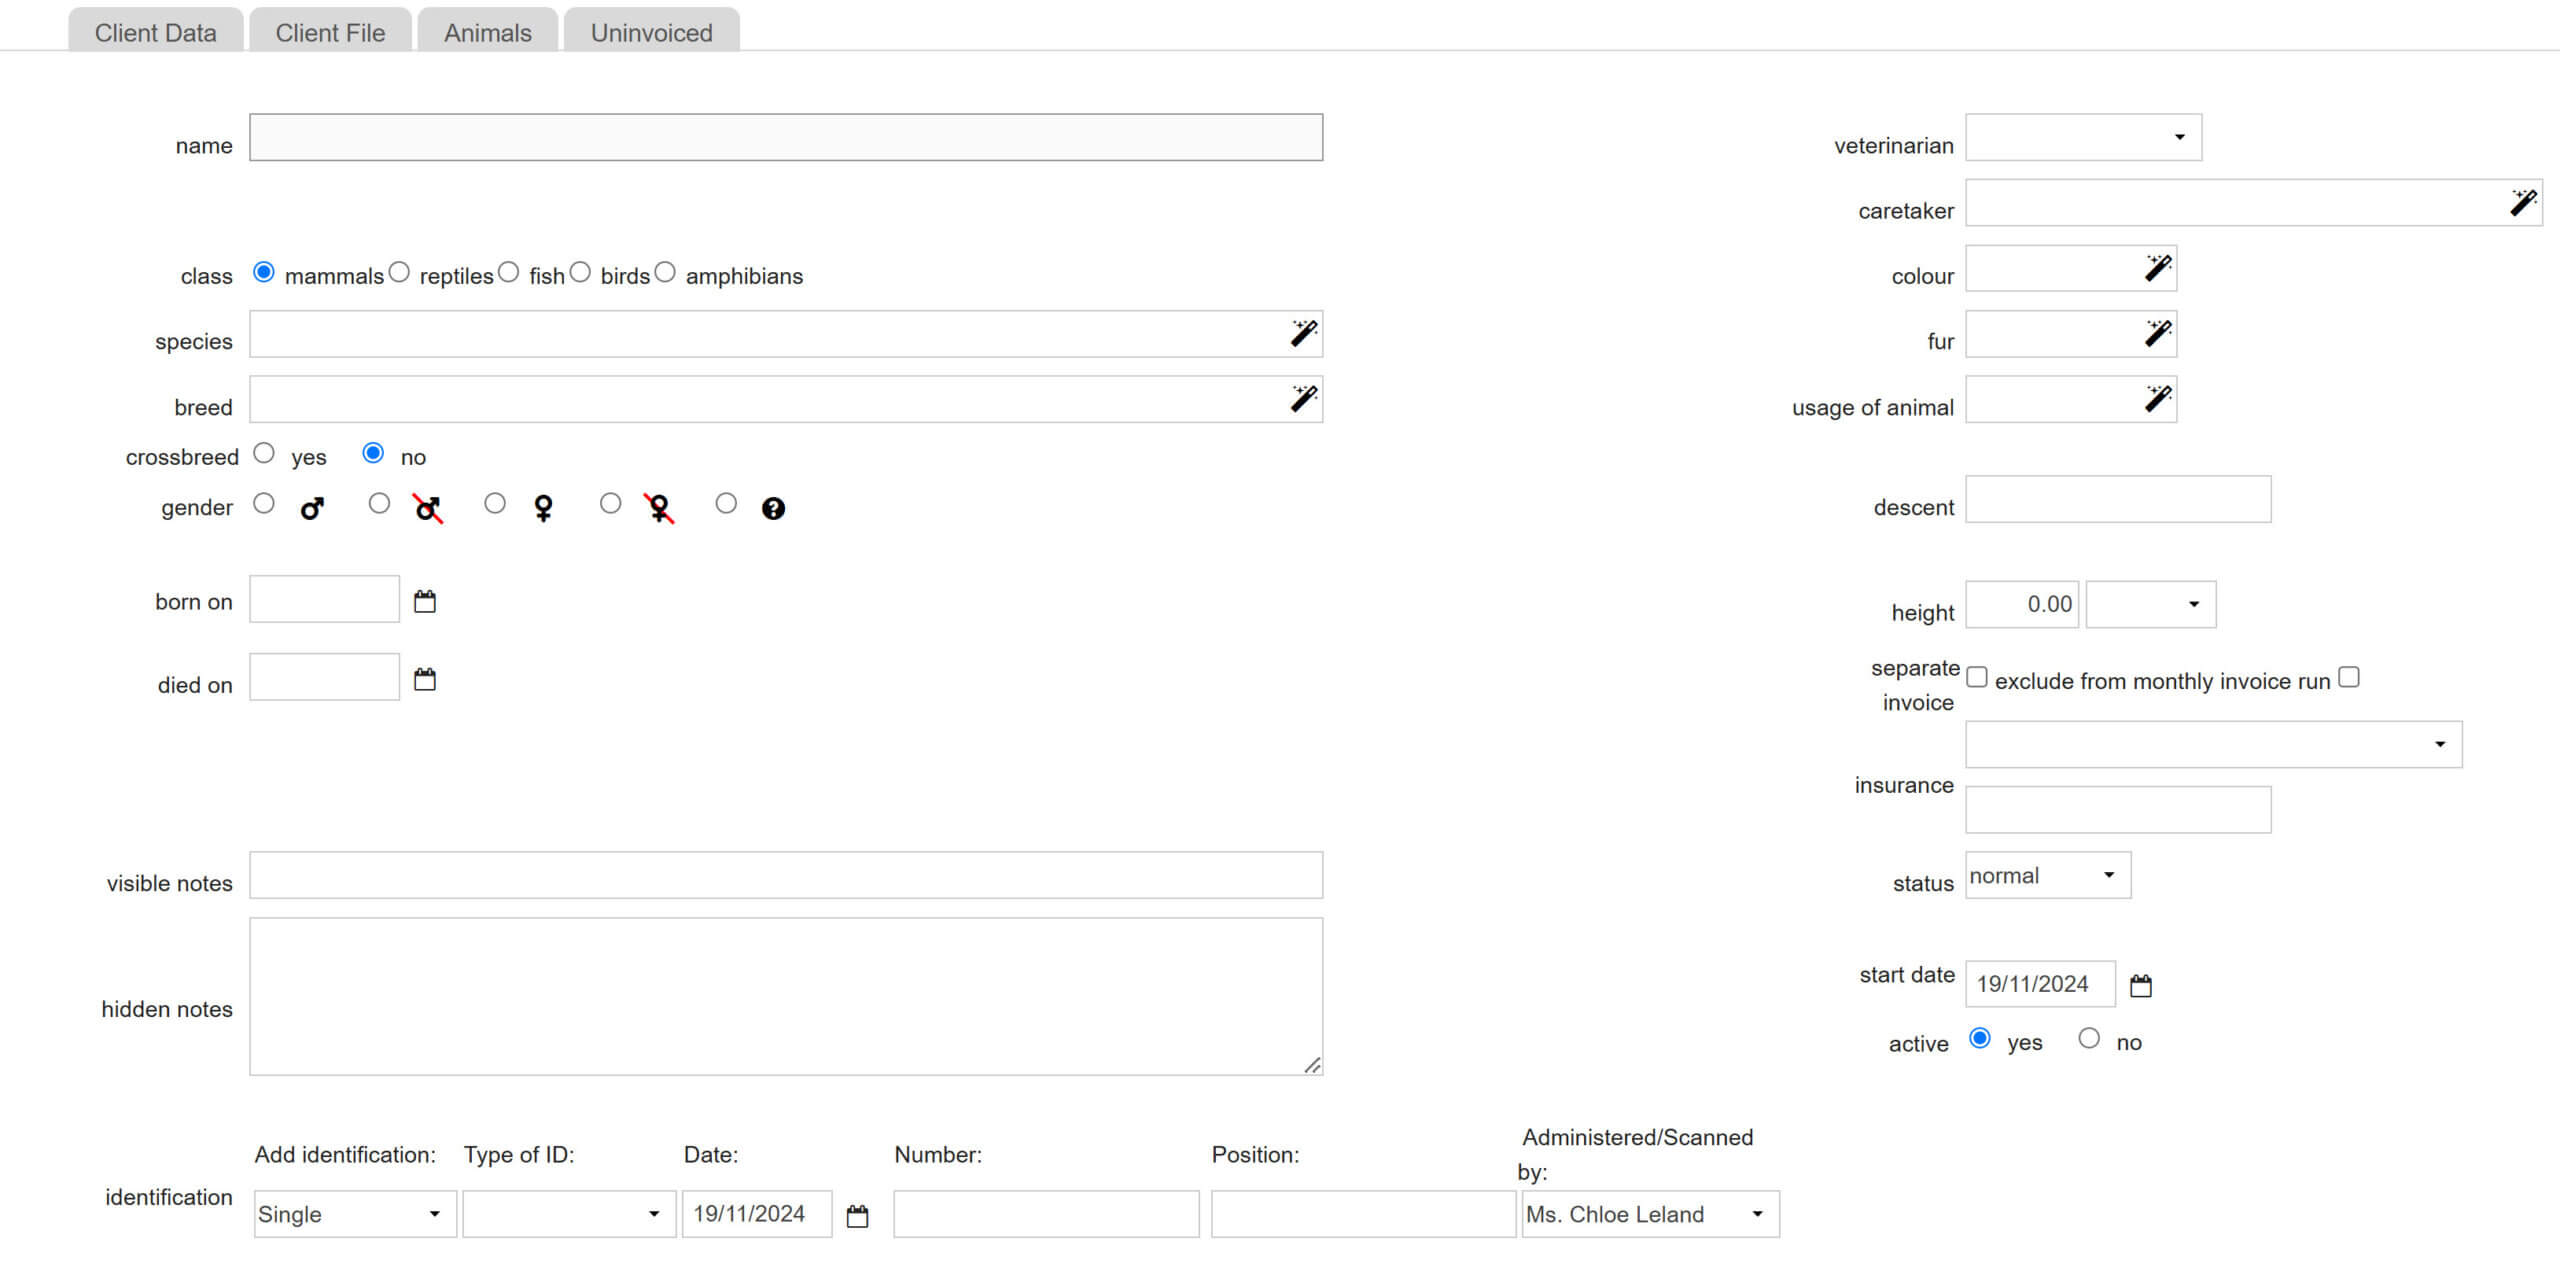
- Enter patient information as appropriate. Please refer to the table below for more information.
This is box titleNote: only the fields for patient name and patient species are mandatory. - Click Save.
- Should you have selected the option “Multiple” in the “identification” field, you will see an additional screen to register the following identification data:
- “Type of ID”: from the drop-down menu, select the type of identification you are entering. The options are: burning, life number, microchip number, other, passport, pedigree number, ringnumber, studnumber, tattoo.
- “Date”: enter the date on which the identification was created/submitted.
- “ID Number” refers to the actual identification number. You can use a barcode scanner to fill in this field.
- “Position” is used to indicate the position/location of the identification on the animal’s body.
- In the field “Administered/Scanned by” you select the veterinarian who created/applied/scanned the identification. You will only find the names of users where the “usertype” is set to “vet” (in User Management).
- Click Save, or Save and add ID if you want to register multiple identifications with this patient.
More about this
What do all the patient data fields mean?
| Field Name | Information | In patient box? | On invoices? |
|---|---|---|---|
| Patient number | Animana's unique patient ID number. This is fixed, it cannot be edited. | Yes | No |
| Name | The name of the patient. | Yes | Yes |
| Class | Select the correct class. The class you select will determine the options for species in the next field. | No | No |
| Species | Enter at least two characters to start a search. You can only choose from search results; you cannot create new species. Alternatively, if you do not remember the species, press the spacebar twice and a list of species belonging to the selected class will appear. The species you select will determine the options for breed (the next field). | Yes | Yes |
| Breed | Enter at least two characters to start a search. You can only choose from search results. Alternatively, if you do not remember the breed, press the spacebar twice and the list of breeds belonging to the selected species will appear. You can also create a custom breed for this patient (however, it will not be added to the list for next time). Before you add a new breed, please double check your spelling, (all breeds should be on the list) | Yes | No |
| Crossbreed | Select "yes" if the patient is a crossbreed, the default value is "no". | Yes (If it's a crossbreed) | No |
| Gender | Select the correct gender from the list. | Yes | No |
| Born on | Enter the patient's date of birth, either manually or by clicking the calendar icon and picking a date. | Yes (Current age is displayed) | No |
| Estimated date | Exiting the "born on" field reveals this field. Tick the box if the date of birth entered above is an estimate. | Yes (Estimation icon is displayed) | No |
| Died on | If the patient has died, enter the appropriate date the patient died. Entering a date here will automatically set the patient as "inactive", delete reminders and will add a condolence reminder to the patient record. If you have scheduled future appointments, you will be asked whether you want to delete or keep them. | Yes (Deceased icon is displayed) | No |
| Visible notes | Enter notes which you'd like to be clearly visible in the patient box in the left sidebar. This can be used for important information and warnings such as patient allergy information. | Yes | No |
| Hidden notes | Enter additional information of this patient, such as travel history. | Yes (Displayed as exclamation mark icon, hovering over it will show the notes) | No |
| Identification | Add a single identification by selecting the type of identification you are adding in the drop-down menu under "Type of ID". In the "Date" field, enter the date on which the identification was created/administered. "Number" refers to the actual identification number. "Position" is used to indicate the position of the identification on the animal's body. In the "Administered/Scanned by" field, enter the veterinarian who created/administered/scanned the identification. You will only find users that have their "usertype" set to "vet" (in User Management). For an existing patient, click "Add" to add an identification or "All Details" to view and edit identification details. | Yes | Yes (Only microchip number is displayed) |
| Subscription | Enter a subscription by clicking on the '+' icon. | No | No |
| Veterinarian | Select a preferred veterinarian from the list. When set, creating a new appointment will automatically select this veterinarian. | No | No |
| Caretaker | Sometimes horses or herds have a caretaker - someone other than the owner who takes care of the animal. If applicable, select a caretaker from the dropdown. If they are not in the list, go to the relevant caretaker's client data tab and mark them as a monthly account holder (in the "Financial" tab). The caretaker will then be displayed at the top of the patient file. | No | No |
| Colour | Enter at least two characters to start a search. Choose a colour from the search results. Alternatively, press the spacebar twice and the list of colours will appear. You can also create a custom colour. | Yes | No |
| Fur | Enter at least two characters to start a search. Choose a fur type from the search results. Alternatively, press the spacebar twice and the list of furs will appear. You can also create a custom fur for this patient by selecting the option "custom fur" and entering a fur type between the brackets. Before you do, first double check the spelling, because all fur options should be in the list. The custom fur will not be added to the list for future use. | No | No |
| Usage of animal | Enter at least two characters to start a search. Choose an animal usage type from the search results. Alternatively, press the spacebar twice and the list of usages will appear. You can also create a custom usage for this patient by selecting the option "custom usage" and entering the usage between the brackets. Before you do, first double check the spelling, because all usage options should be in the list. The custom usage will not be added to the list. | No | No |
| Descent | Enter the name of the parents of this patient in this field. Relevant for pedigree dogs and horses. | Yes | No |
| Height | Enter the height of the patient. Select 'cm' or 'm' in the dropdown. | No | No |
| Separate invoice | Select if you want a separate invoice for this patient by default. If the client has a consultation with multiple animals, this patient will receive a separate invoice. This option is recommended for patients with insurance. | No | No |
| Exclude from monthly invoice run | Select if you want this patient to be excluded from your monthly invoice runs. | No | No |
| Insurance | Select an insurance company and the policy number. Tip: for insured patients, we advise you to check the box for "separate invoice". | Yes (Displayed as umbrella icon, hovering over it will show the information) | Yes |
| Status | By default, the patient status is "normal". You can change the status manually. In case of euthanasia with a product with the action "euthanise" appointed to it, the status of the patient is automatically changed to "euthanasia". | Yes | No |
| Start date | The date the patient file was first created. | No | No |
| Active | By default, "yes" is selected to indicate that the patient is current. Select "no" if you want to deactivate the patient. When entering a death date or adding a product with the action "euthanise" appointed to it, the animal is automatically deactivated. Inactive patients do not receive mailings and reminders. | No | No |
| Button: Add Picture of Patient | Click the button to add a picture of the patient. | Yes | No |
| Button: Health Plan | Click the button to add a health plan to this patient. You can choose from health plans that you have set up in your account in Extra > Products > Health Plans. | Yes | No |
| Button: Move Patient | Click the button to move the patient to a new owner. Follow the simple instructions to link the patient to the new owner. | Yes (Displayed as hidden note) | No |