In Animana you can easily send mailings to your clients. The mailing filters allow you to quickly filter client, patient and product data, so you can send a marketing campaign. This is a great way to inform your clients about new developments or promotions such as a discount campaign, a newsletter, or a new product. This article will explain how you can use the mailing filter on patient data to send out a mailing.
Before you start
- You need permission to be able to create and send mailings. Permissions can be adjusted by practice administrators in
 > General Settings > Role Management.
 - You need to have text templates set up for the mailing you want to send out. With the right permission, you can create content in > General Settings > Content Designer. Make sure that the letter category and letter context is set to “mailing”.
- Make sure the SPF records for emailing have been set up correctly. See the Related articles.
Step-by-step instructions
Example: You want to send out a mailing to your clients with pets that do not have a microchip yet.
- Go to
 > Mailing > Mailing Filter Patients.
 - Next to “mailing” you can select how you want to send this mailing (call, labels, letters, email, text message).
- If you want to send a follow-up mailing to clients that have received a previous mailing, you can select that previous mailing from the dropdown-menu “has received mailing”. If it’s not a follow-up mailing, you can leave this field empty.
- It is possible to filter by “species” and “breed”. Enter the desired value in these fields.
If you want to search for patients or herds that have been recently active, select a date using the date picker or by entering the date directly in the “last activity after” field. Only patients/herds with activity after that date will then be shown in the search results. - You can filter by gender and neuter status using the radio buttons.
- If you are targeting patients of a specific age, you can search using the “born between” date selection fields.
This is box titleThe “born between” is actually a date filter – so if you select “filter age” then it filters on the birth DATE and if you select “filter anniversary” it filters on the birth DAY (day and month only, not the year). - Target the mailing towards patients/herds of a specific weight by entering “less than or equal to” (<=) or “greater than or equal to” (>=) weights – measured in kilograms. If you are working with Microchips you can choose specifically to include or exclude them here.

- If you selected to send “letters”, “email” or “text message” in step 2, you can choose which template to use for the mailing by selecting it in the dropdown menu “select template”.
- If you selected the option “email” in step 2, and you want to receive a copy of the mailing, then you can enter your own email address in the field “send bcc copy to”. Your email address will not be visible to recipients of the mailing.
This is box title
Beware: the email address you add here will receive a copy if each message. For instance, should you send the mailing to a 1000 recipients, this mail address will receive 1000 email copies.
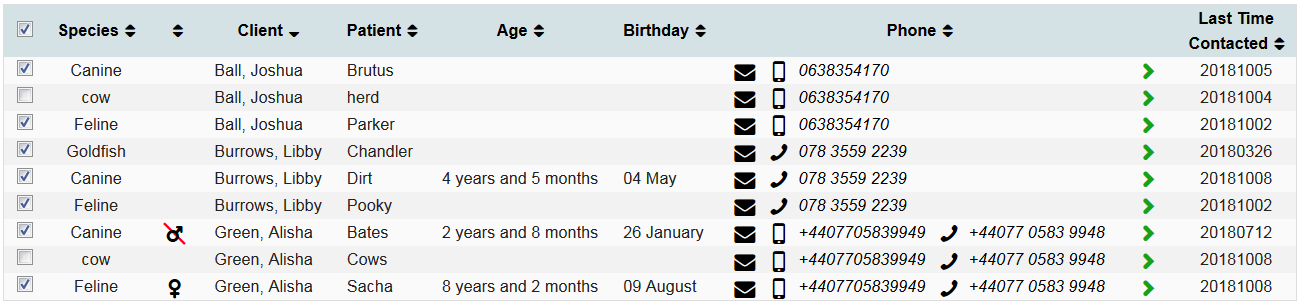
- Click the Show Selection button to see the results. Review the list and if needed you can select/unselect clients by using the checkboxes on the left.
-
Click the Print/Send Selection button to send the mailing.
More about this
How can I check if my mailing has been sent?
After you click the Print/Send Selection button (step 11 above), the mailing task will be executed in the background. Once the mailing has been completed, you will receive a notification in your message inbox (![]() ). The message is titled “Mailing Report” and includes the title of the mailing, the date and time of sending, as well as the names of the recipients.
). The message is titled “Mailing Report” and includes the title of the mailing, the date and time of sending, as well as the names of the recipients.
How can I send a Word newsletter from Animana?
- First create the newsletter as an email template in Animana. You can do this by adding a new email in the Content Designer. See: Learning Path: Content Designer
- Make sure the category and context of that email are set to “mailing” in the Content Designer.
- Follow the step-by-step instructions above to send the newsletter.
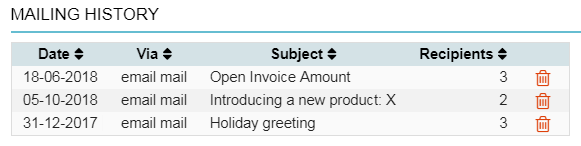
How can I see which mailings I have sent in the past?
- Go to > Mailing > Mailing history.
- You will see an overview with a log of all the bulk mailings which have been sent from Animana. The date of the mailing, the mailing method, the subject of the mailing and the number of recipients are specified in the overview.
 This is box title
TIP: You can sort by each column – just click the arrows at the top of each column.
How can I see which mailings I sent out via text messages?
- Go to > Mailing > Overview Sent Text Messages.
- You will see an overview with a log of all the text messages which have been sent from Animana. The date of the text message, the time, mobile phone number, name of the owner and pet, username of the user who sent out the text message, the context, SMS count and status. Text messages sent via mailing will have the context “mailing” specified.
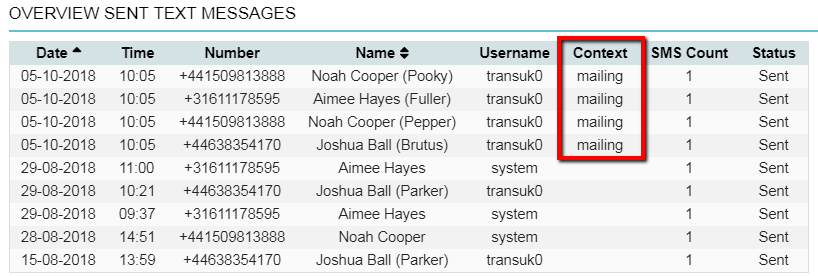 This is box titleTIP: The columns that have arrows at the top can be sorted by clicking on the column header.
Related articles
- Learning Path: Content Designer
- How do I exclude clients from receiving marketing related messages?
- How do I send marketing messages based on product data?
- How do I send marketing messages based on contacts?
- How do I prevent sent emails from Animana being marked as spam because of my spf records?
- How do I fix the most common email problems?