Animana allows you to create multiple locations. This is very useful when you have multiple branches or when you are using company cars to do farm calls. By default your account will have at least one location. Usually this location holds the name of your clinic. You can check the name of the location in the top right hand corner of your screen as shown below: It is also visible when you click on the
 ![]() icon on the top right hand corner of your screen > click on General Settings > select Locations on the left sidebar.
icon on the top right hand corner of your screen > click on General Settings > select Locations on the left sidebar.
Why should I set up multiple locations in Animana?
- Your clinic has multiple branches in different streets/towns.
- When one or more employees regularly visit clients at home it could be helpful to create separate locations for their cars. This allows you to have detailed stock management, a separate appointment group and separate turn over reporting.
- When your clinic has a livestock and a companion animal department, then you could split this in multiple locations in order for each of them to have their own administration.
- If you are regularly on call, you might decide to create a separate location for those consultations in order to keep their administration separate.
How do I create a new location?
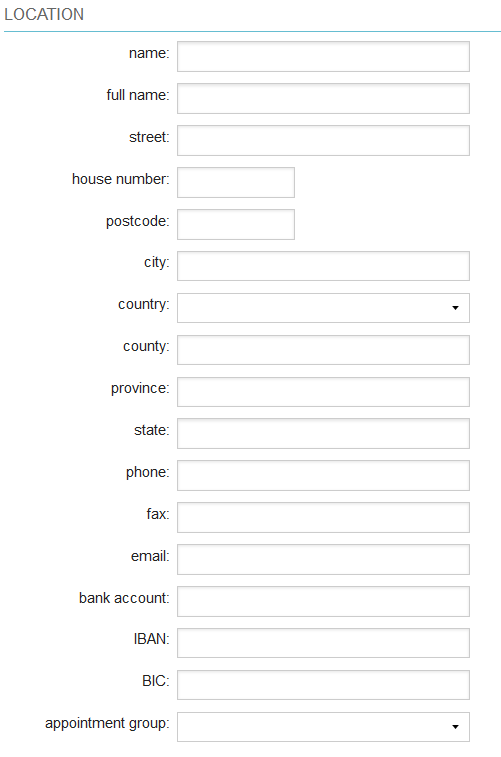
Click on the ![]() icon, click General Settings > click Locations. Click
icon, click General Settings > click Locations. Click ![]() and fill in all the details of the new location. You will find the explanation of ‘appointment group’ further down in this article under “What settings do I need for the new location”. Click Save when you have finished.
and fill in all the details of the new location. You will find the explanation of ‘appointment group’ further down in this article under “What settings do I need for the new location”. Click Save when you have finished. 
When you set up the e-mail address in the format ‘info@yourclinicwebsite.com’ the part before the @ (in this example ‘info’) will be shown as the sender. This is a reason for e-mails to end up in the spam folder.
Therefore, we suggest you enter your e-mail address in this format instead: “Your-Clinic-Name <info@yourclinicwebsite.com>”. The receiver will then see ‘Your-Clinic-Name’ as a sender.
What is the difference between name and full name?
The ‘Name’ is created for internal use. This name appears within the application, for example when you login, when you switch location or when you choose to use details of this location. The ‘Full name’ is created for external use and shows on documents such as labels, invoices and letters. Example: Clinic Healthy Pets has 3 locations: one in London City, one in Guildford and one in Croydon. For ‘Name’ you could choose, respectively: City, Guildford, Croydon. This allows employees to see which location they are logged in to. For ‘Full Name’, you could choose: Healthy Pets London City, Healthy Pets Guildford, Healthy Pets Croydon.
What settings do I need for the new location?
Besides the standard settings for a location you can have extra settings for:
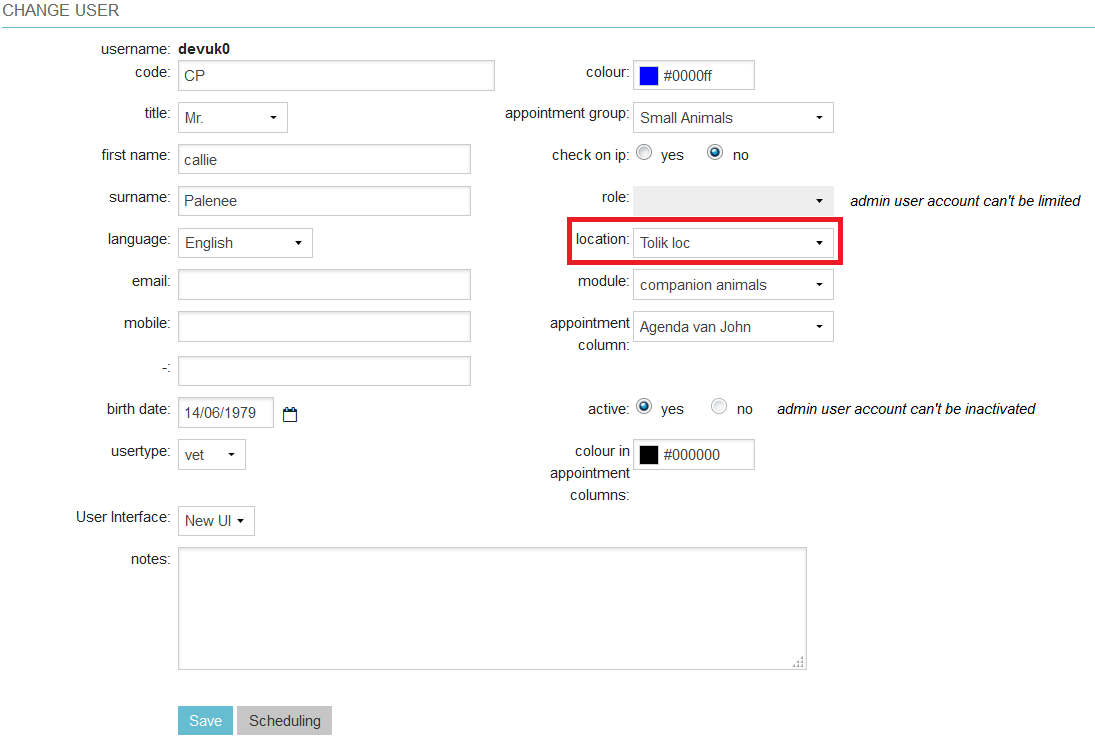
- Default location. In User Management you can set the default location for each user. The user will automatically be logged in into this location.
- Ledger Scheme (you can set separate ledger numbers for the new location).
- Stock Management (you can have separate stock management for the new location)
- Letter Header Administration (you can set a different header and footer for the new location)
- Diary (the new location can be used as an option in the diary)
Default Location
Click on the ![]() icon, General Settings > User Management you can enter a default location for a user. The user will automatically be logged in to this location.
icon, General Settings > User Management you can enter a default location for a user. The user will automatically be logged in to this location. 
Ledger scheme
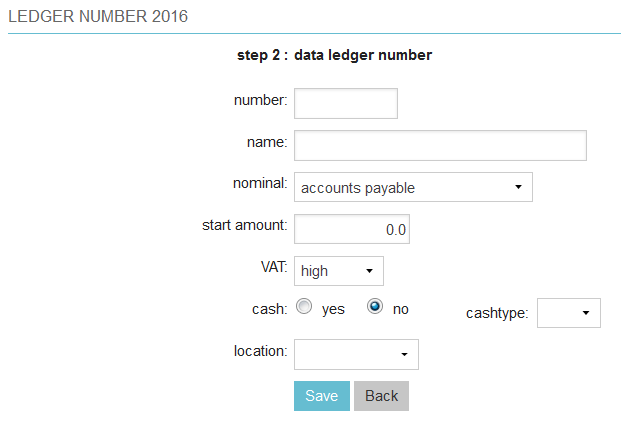
The different branches of your clinic will have their own administration and therefore need their own settings for the financial modules. Each branch has its own cash and card account and will need its own suspense accounts. To set those, click on the ![]() icon in the Header bar > Financial > Ledger Scheme and follow the instructions below. Before you add new numbers, first decide which ones you want to use. When the ledger number for cash in the main location is 1000, then it would make sense to use 1001 or 1010 for location X and 1002 or 1020 for location Y. Please make sure the order is logical. When you have decided which numbers to use for cash, card and suspense accounts, you can add the ledger numbers. Click on “Add Ledger Number”, choose “cash/bank accounts”, click Next and you will see:
icon in the Header bar > Financial > Ledger Scheme and follow the instructions below. Before you add new numbers, first decide which ones you want to use. When the ledger number for cash in the main location is 1000, then it would make sense to use 1001 or 1010 for location X and 1002 or 1020 for location Y. Please make sure the order is logical. When you have decided which numbers to use for cash, card and suspense accounts, you can add the ledger numbers. Click on “Add Ledger Number”, choose “cash/bank accounts”, click Next and you will see: 
- Enter the ledger number you have chosen,
- Enter the Name (cash, card or suspense and location name),
- Enter the “nominal” to select which subgroup the ledger should appear in
- Enter the start amount
- Change the VAT to “none”.
- For the “cash” radio buttons
 choose “yes” for cash, card, or cheque. A button will now display for this payment type when making a payment against an invoice. If it is a suspense ledger, choose “no”
 - Choose the cash type (Cash or Card but leave blank for Cheques)
- Finally choose the location that this ledger is based at
- click Save.
Repeat the steps above for each new location.
Entering Stock
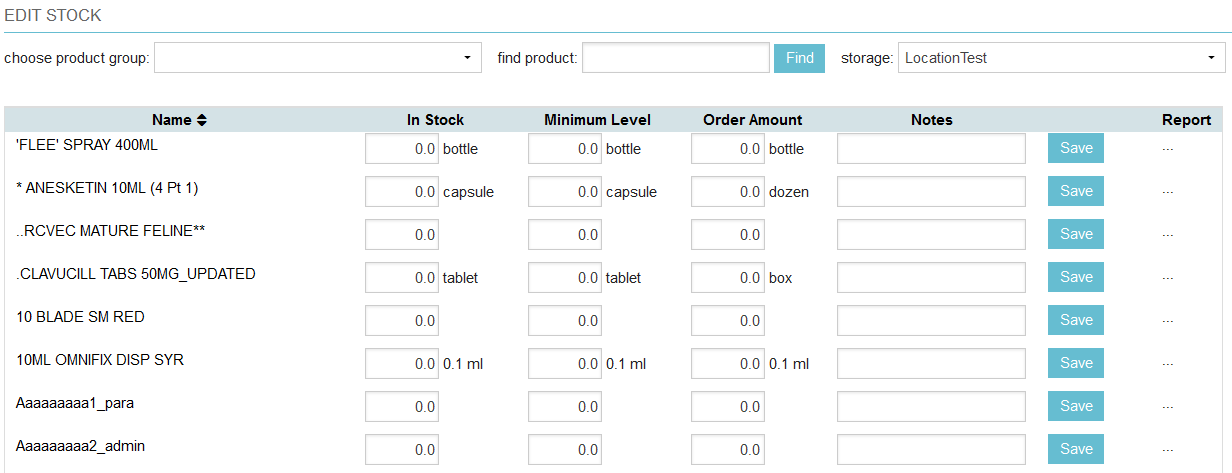
Each location has its own stock management. Click on the ![]() icon in the Header bar, then Stock > Edit Stock and you can enter the settings per product for the new location.
icon in the Header bar, then Stock > Edit Stock and you can enter the settings per product for the new location. 
Letter Header and Footer
Each branch can have a different address and so you can use different letter headers and/or footers for each location. Select Settings > General Settings > Letter Header Administration and choose the files you want to use for the new location. If you don’t choose any header and footer for the new location, the header and footer of the main location will be used.
Settings for the diary
First create a new appointment group, then you can link the appointment group to the location.
- Click on the
 icon > General Settings > Appointment Groups, click on the + to add a new group. Please refer to this article for more information.
 - To link the appointment group to the location go to Click on the
 icon > click General Settings > Locations and choose the location. Go to the appointment group drop down and select the group you wish to link to this location. Save
